
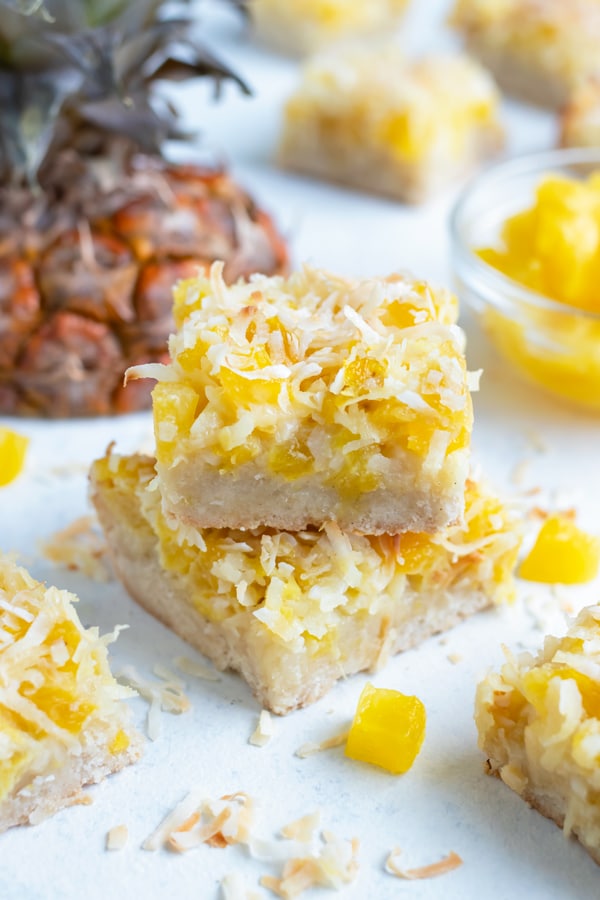
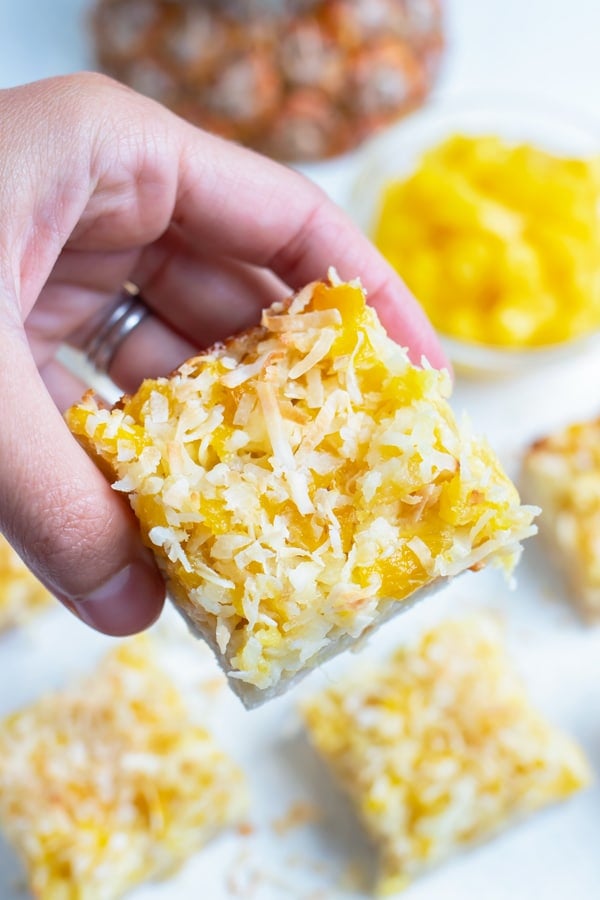
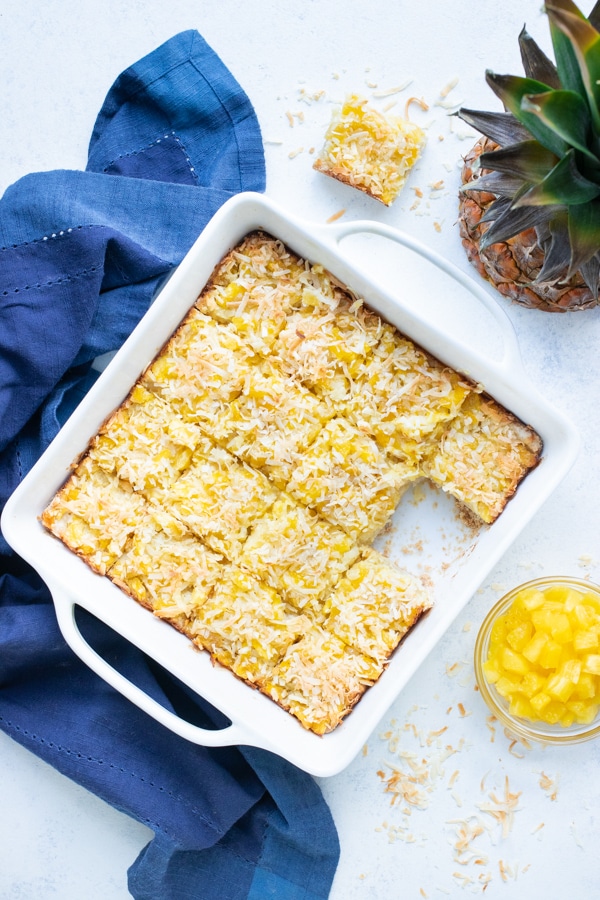
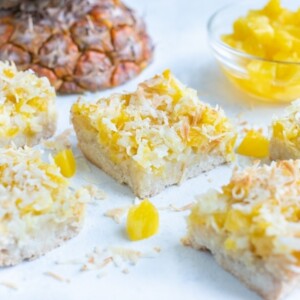
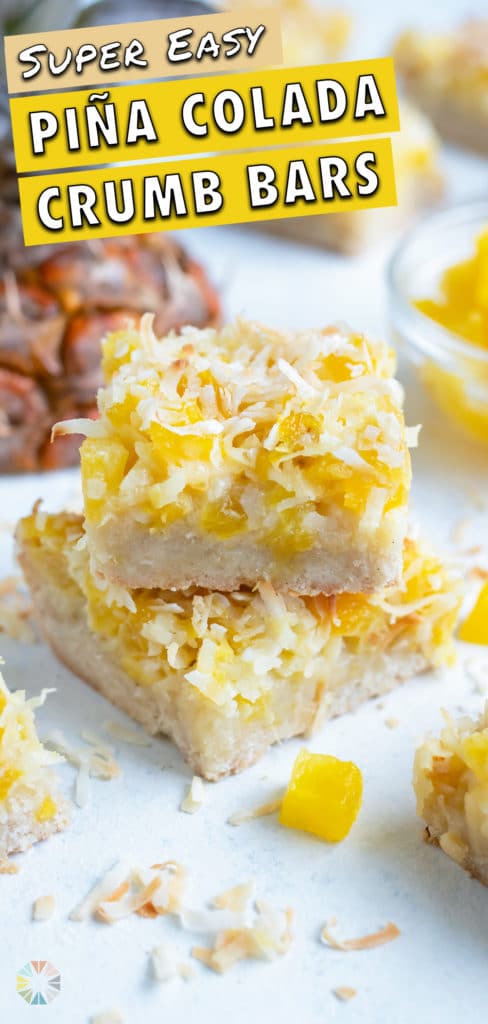
Sweet, buttery, and so simple to make, this Piña Colada Bars Recipe will be your new favorite summer dessert! Fresh pineapple and shredded coconut top a flaky shortbread crust that is easily made gluten-free. Cut into squares and enjoy your favorite frozen drink in dessert form!
A mound of diced pineapple stared back at me from my cutting board.
After completing this How to Cut a Pineapple step-by-step tutorial, I realized I would now have to DO something with all of this juicy and sweet fresh fruit!
The first thing that came to mind was, of course, to turn it into a Homemade Piña Colada. But if I followed my favorite recipe, then I would have to wait HOURS for the fresh pineapple to freeze before I could even make one.
Hmmm… after pacing the kitchen for a few minutes I decided to peruse the ingredients in the pantry.
Shredded coconut… yes. Gluten-free flour… check. Butter… well, duh! We’ve always got that on hand.
Pineapple bars it would be!! And not just ANY pineapple bars. Oh no, these were going to taste just like that delicious frozen cocktail I was craving… but in dessert form!
And man, can I tell you something?! These Piña Colada Bars really live up to all you’ve ever dreamed of.
The fresh pineapple (instead of canned!) ensures the bars are not too sweet.
Just the right amount of butter is used to keep the shortbread crust super flaky while not over-doing it.
And that coconut?! Sprinkling on a little extra before baking will give you a lovely golden topping while also delivering a delightfully toasty taste.
But fair warning. These are so balanced in sweetness and buttery goodness that you WILL have to practice some self-control. Because before you know it the entire tray may disappear! (Trust me on this one!)
Ingredients
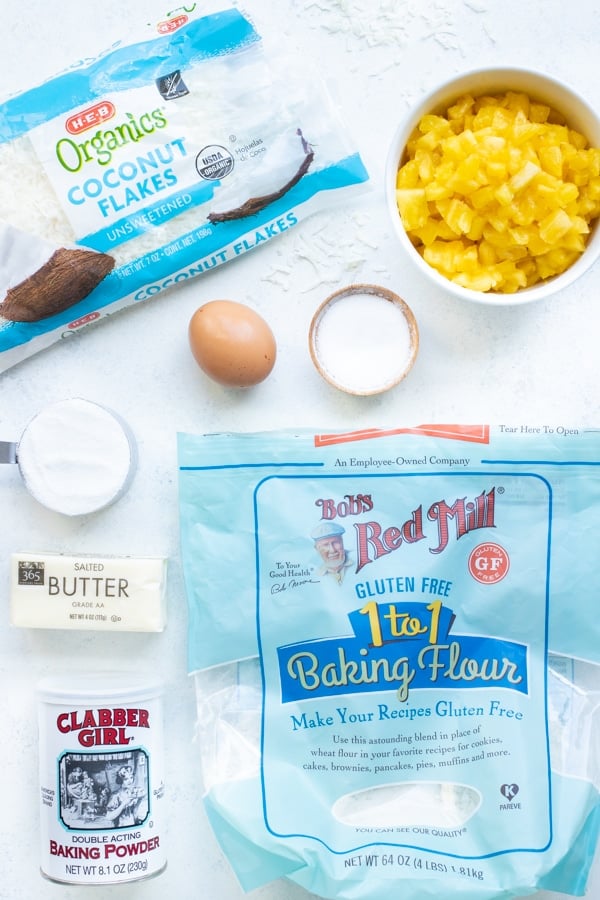
The simple ingredients you need to make these pineapple coconut bars include:
- Pineapple – Fresh is best to use. Read below for more information.
- Coconut – Use finely shredded instead of large flakes. Also make sure to use unsweetened and not sweetened coconut.
- Flour – A gluten-free 1-to-1 flour is used in this recipe. You can substitute it for all purpose flour cup-for-cup.
- Butter – Unlike some baking recipes, salted butter is recommended. It helps to balance out the sweet notes.
- Sugar – Regular white sugar is best. Coconut sugar may work for a refined-sugar free treat, but it hasn’t been tested. Please note- if you use coconut sugar the bars will come out a darker color.
- Egg – This helps to make a custard-like filling. Using an egg replacement for this recipe is not recommended.
How to Make
These are the easy step-by-step instructions to follow when making this pineapple bars recipe:
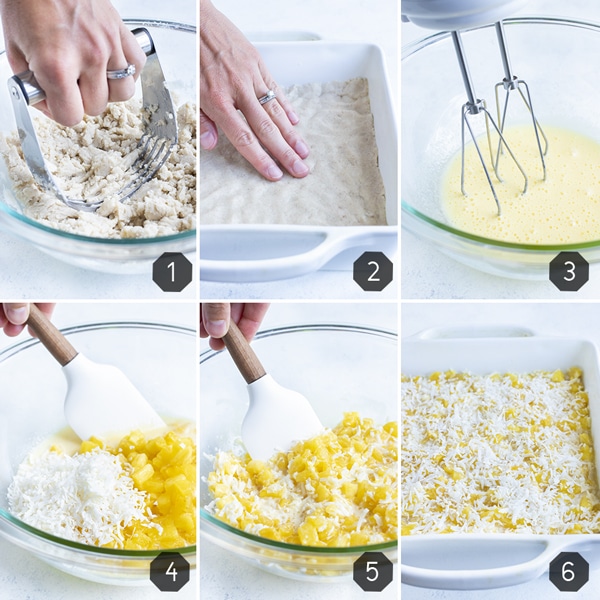
- Combine all of the shortbread crust ingredients in a large bowl. (step 1 above)
Using a pastry cutter or mixer on low speed, mix the ingredients together until a coarse crumb forms. Softened and almost melted butter is key for the crust. If it’s too firm, the crust will come out crumbly.
- Press mixture into a baking pan and then pre-bake. (step 2 above)
Use an 8×8 pan sprayed with non-stick cooking spray. Any larger or smaller and the bars won’t have the correct thickness. Also, make sure you really pack down the crust. If it’s not firmly packed, the crust will come out crumbly.
- Combine the remaining sugar, egg, and butter in a large bowl .(step 3 above)
Beat with a mixer on medium speed for 1 minute. (You can even use the same bowl for easier cleanup!)
- Add diced pineapple and ½ cup of shredded coconut. (step 4 above)
Gently fold in the pineapple and coconut by hand until just combined. Do not use a mixer.
- Pour the pineapple filling over the pre-baked crust. (step 5 above)
Spread it out evenly, then sprinkle with remaining shredded coconut.
- Bake in the oven for 35 to 40 minutes. (step 6 above)
Look for when the edges begin to brown and the middle no longer jiggles.
- Let the bars cool to room temperature.
Resist all urge to cut in too soon! The bars continue to set up as they cool down.
Fresh vs. Canned Pineapple
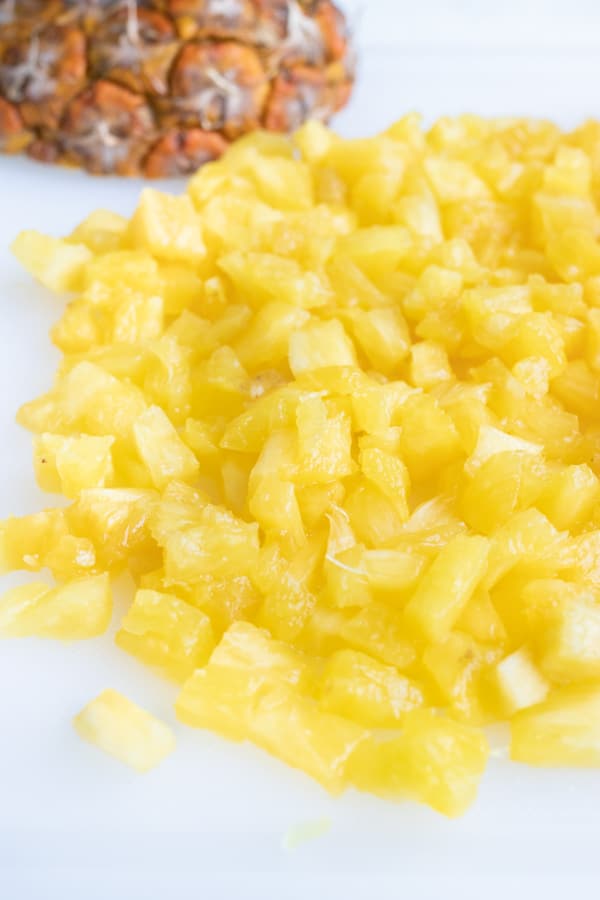
Definitely use fresh pineapples whenever possible. They’re best when in peak season, which is from March to July. You can either get the pre-cut kind or Cut a Whole Pineapple. You’ll need about ½ of a pineapple to get the correct amount for this recipe.
Using canned is not recommended, as it is generally much sweeter. If you do use canned try to find one in 100% pineapple juice as opposed to syrup.
You can also thaw frozen pineapple to use. If so, make sure to defrost first and remove all of the watery liquid so it doesn’t make the bars soggy.
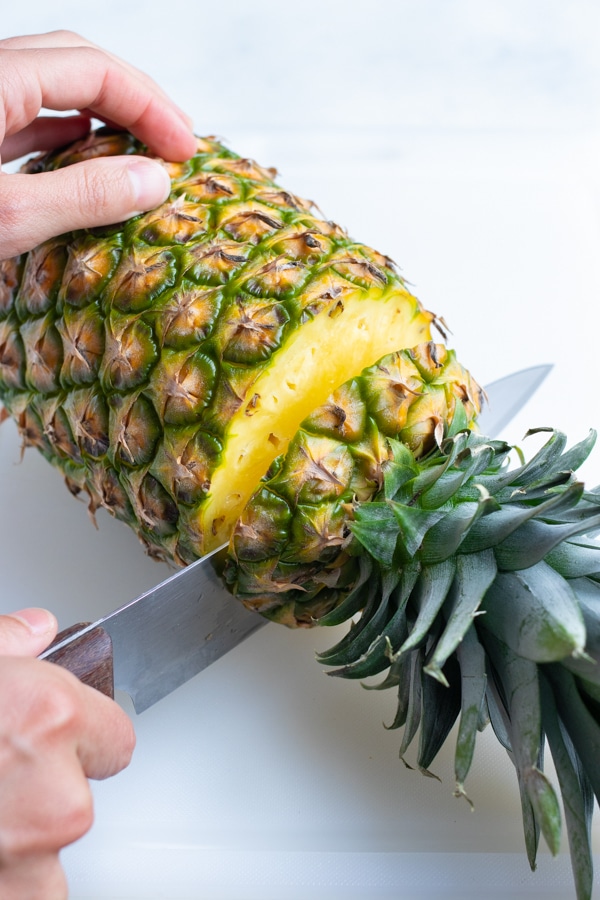
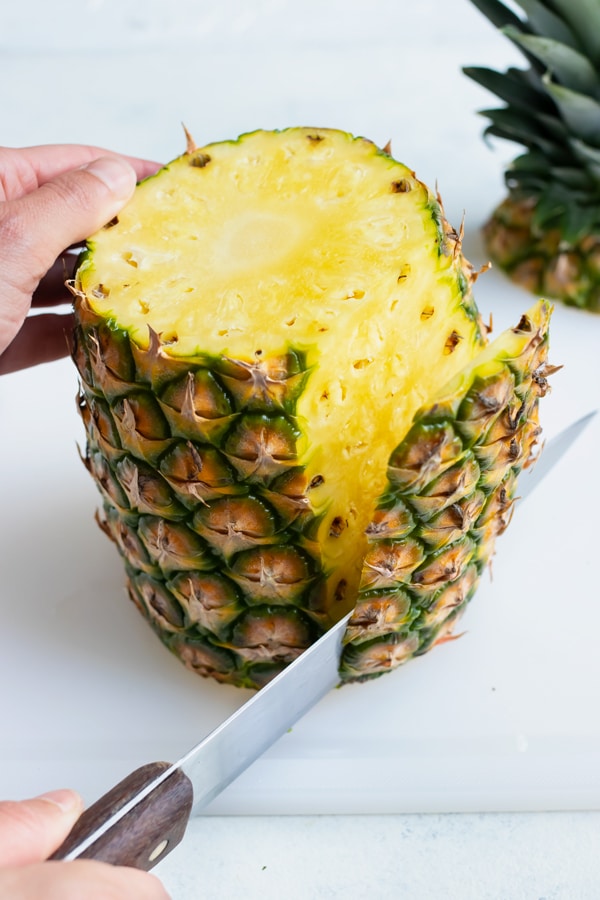
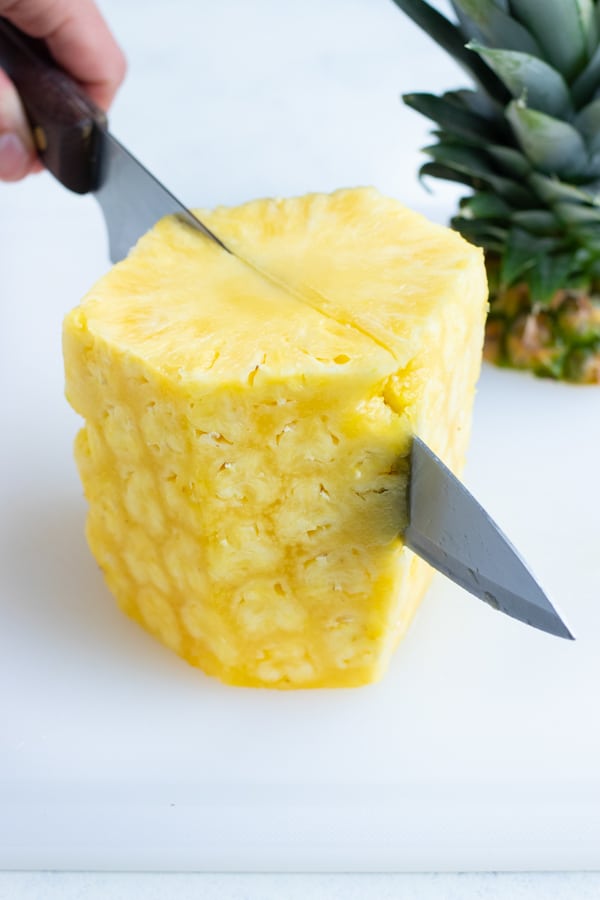
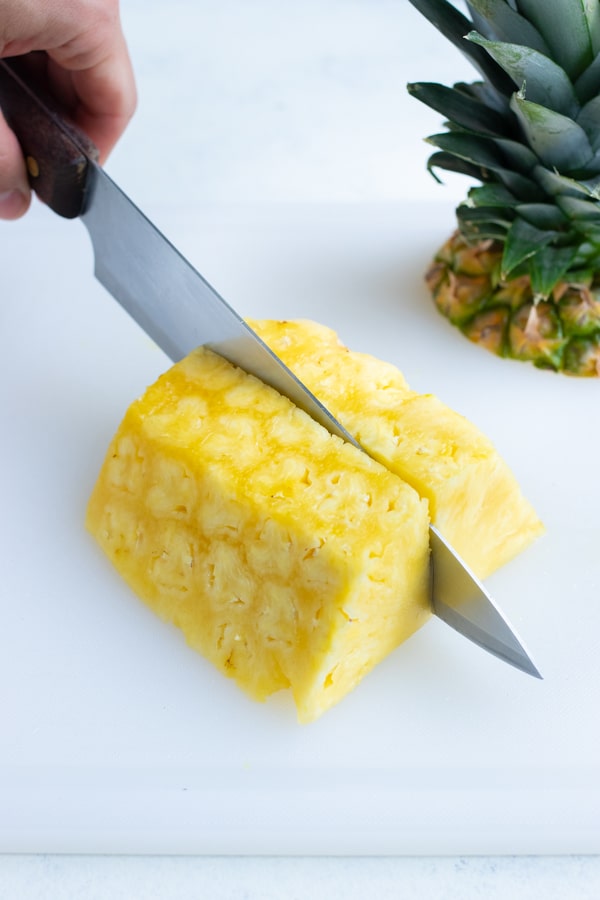
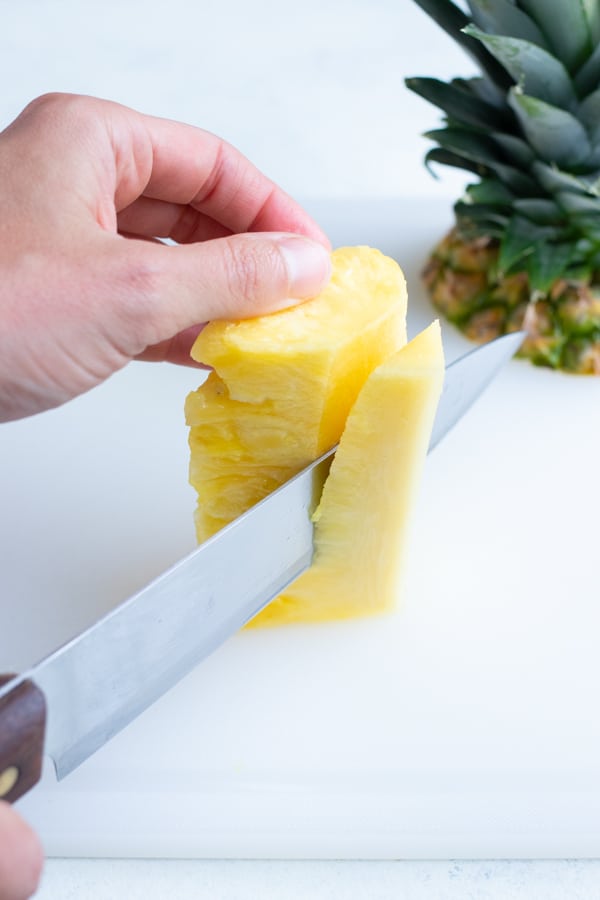
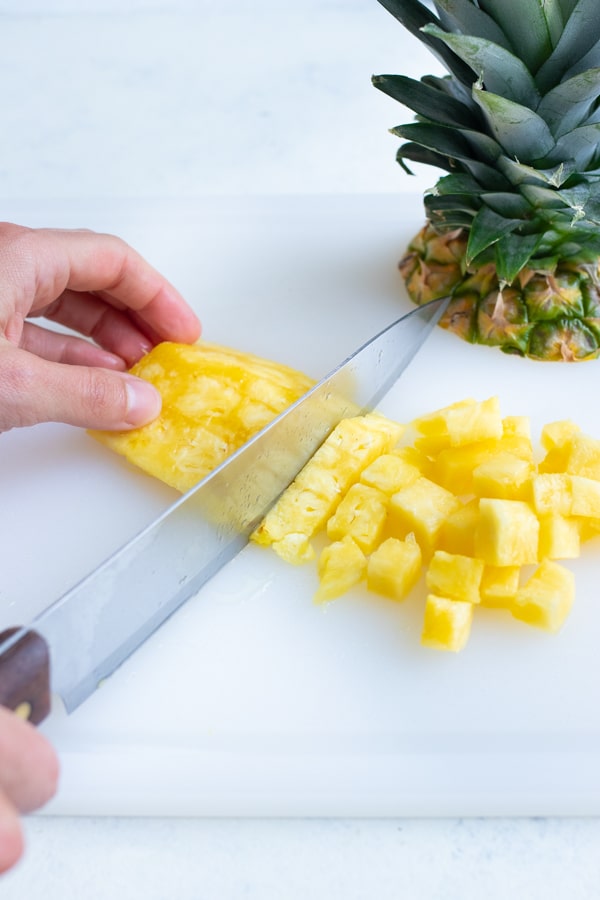
Cutting a Pineapple
Preparing a fresh pineapple is actually easier than it sounds. Here are the quick steps for cutting a pineapple:
- Remove the top and bottom of the pineapple.
- Slide a sharp knife between the flesh and the rough skin until all the skin is gone.
- Slice the pineapple in half lengthwise, then in half again to form four quarters.
- Cut about ½-inch into the flesh from the center to remove the core.
- Finally dice the pineapple into small pieces.
Read more details in this tutorial for How to Cut a Pineapple.
Serving and Storage
- To Serve: Let the bars cool COMPLETELY before serving. The middle takes a while to set. If you cut in too soon you’ll end up with a crumbly crust and gooey middle.
- To Store: Keep the bars for up to 3-4 days at room temperature.
- To Freeze: You can also keep these in the freezer for up to 3-4 months. Tightly wrap them before freezing.
Dietary Modifications
The recipe you’ll find below is already vegetarian as written. Here are some adjustments and substitutions you can make to help it fit your other dietary requirements:
- Gluten-Free- You can use a gluten-free flour blend such as Bob’s Red Mill 1-to-1.
- Dairy-Free- Use a butter alternative such as Earth Balance sticks or even coconut oil.
- Refined Sugar-Free– Try using coconut sugar in place of the regular sugar. Avoid using liquid sweeteners such as honey.
FAQs
Using fresh pineapple is highly recommended. If you have to use canned make sure to get the kind in pineapple juice and NOT syrup.
When the edges begin to brown and the middle no longer jiggles, the bars are done cooking. But remember, they need to rest before slicing.
No, these bars can safely be stored at room temperature for up to 4 days.
Expert Tips and Tricks
- Fresh is best. For the best flavor, use fresh pineapple, not canned.
- Dice it really small. You want the pineapple to be cut no bigger than ¼-inch squares.
- Soften the butter. This way the crust doesn’t come out too crumbly and will mix together more easily.
- Pre-bake it. The crust needs a little extra time in the oven so it can get cooked through.
- Sprinkle with coconut. It adds the perfect toasted finish.
- Have patience. Don’t cut into them too soon. The bars need to cool completely before enjoying.
Other Fresh Pineapple Recipes
Have plenty of fresh pineapple on hand? Try these other tasty recipes:
Instant Pot Hawaiian Pineapple Chicken
Tap stars to rate!
Piña Colada Bars Recipe
email this recipe!
Ingredients
Shortbread Crust:
- 1 ½ cups flour gluten-free
- 10 Tbsp. butter melted
- ⅓ cup sugar
- ½ tsp. baking powder
- 1 tsp. vanilla
- ¼ tsp. salt
Pineapple Coconut Filling
- ⅓ cup sugar
- 1 large egg
- 2 Tbsp. butter melted
- 2 cups pineapple finely diced
- ¾ cup shredded coconut divided
Instructions
- Preheat oven to 350°F.
- Combine all of the shortbread crust ingredients in a large bowl. Using a pastry cutter, mix the ingredients together until a coarse crumb forms.
- Spray an 8×8-inch square baking dish with non-stick cooking spray.
- Press mixture into dish and make sure it is all packed down.
- Bake crust in preheated oven for 15 minutes.
- While the crust is baking, combine the remaining sugar, egg, and butter in the same large bowl. Beat with a mixer on medium speed for 1 minute.
- Add diced pineapple and ½ cup of shredded coconut. Mix by hand until ingredients are just combined.
- Pour the pineapple-coconut layer over the pre-baked crust and spread it out evenly. Sprinkle remaining ¼ cup shredded coconut over the top.
- Bake in oven for 35-40 minutes or until the edges begin to brown and the middle no longer jiggles.
- Let bars cool to room temperature before cutting in. Enjoy!
Tap stars to rate!
Notes
- Learn How to Cut a Pineapple.
Serving and Storage
- To Serve: Let the bars cool COMPLETELY before serving. The middle takes a while to set. If you cut in too soon you’ll end up with a crumbly crust and gooey middle.
- To Store: Keep the bars for up to three to four days at room temperature.
- To Freeze: You can also keep these in the freezer for up to three to four months. Tightly wrap them before freezing.
Nutrition
Nutrition information is automatically calculated, so should only be used as an approximation.

Yummy
Yay! So happy to hear you enjoyed the recipe, Luisa! Thanks so much for taking the time to leave a comment and rating!
Dos the crust need to cool first? I used chopped fresh pineapple and gets liquid that came out in the mixture so on hope it won’t make the crust soggy.
Thanks for the recipe.
No, the crust shouldn’t have to cool first. But it is best if the pineapple isn’t too liquid-y. If you can separate the pineapple from the liquid that would be best!
Yum!
Yay! So happy to hear you enjoyed the recipe! Thanks so much for taking the time to leave a comment!
I made these this afternoon with a couple tweeks. I added 2 T of cream of coconut to the shortbread dough aand made a double batch so I could sprinkle bits of the dough on top. So good!!
Yay! So happy to hear you enjoyed the recipe, Sharon! Thanks so much for taking the time to leave a comment!
I made this tonight. I was so nervous after reading the comments but they came out PERFECT! My friends tried them and loved them! Thanks so much for the recipe! I will definitely be making these again and again!
Yay!! So happy you and your friends enjoyed them so much. Thanks for taking the time to leave a comment and rating 🙂