

My party app that always disappears fast!

I grew up in the era of quick meals and packaged party foods, with two hardworking parents who also loved to host. And no matter the occasion—Christmas Eve, baby showers, you name it—mini quiches always made an appearance.
For years, I relied on the frozen kind, assuming homemade was too much work. But once I finally gave it a try, I realized I could whip up four dozen in under 45 minutes!
But maybe the best part of all? They taste a million times better than store-bought and are totally customizable.
Go with spinach and mushrooms for the veggie-lovers, or crispy bacon and melty Gruyère combo for the carnivores out there. Plus, you can prep them ahead and pop them in the oven right before guests walk in—freeing you up to meet and mingle!
Can’t get enough quiche? Don’t miss out on my classic Quiche Lorraine or Quiche Florentine!
Made these this morning. So easy and so good… Great for meal prep and to have for busy mornings. Will be interested to see how they taste reheated but I am sure they will be great.
– Erica


Ingredients and Substitutions
For the exact measurements and detailed instructions, please see the recipe card below.
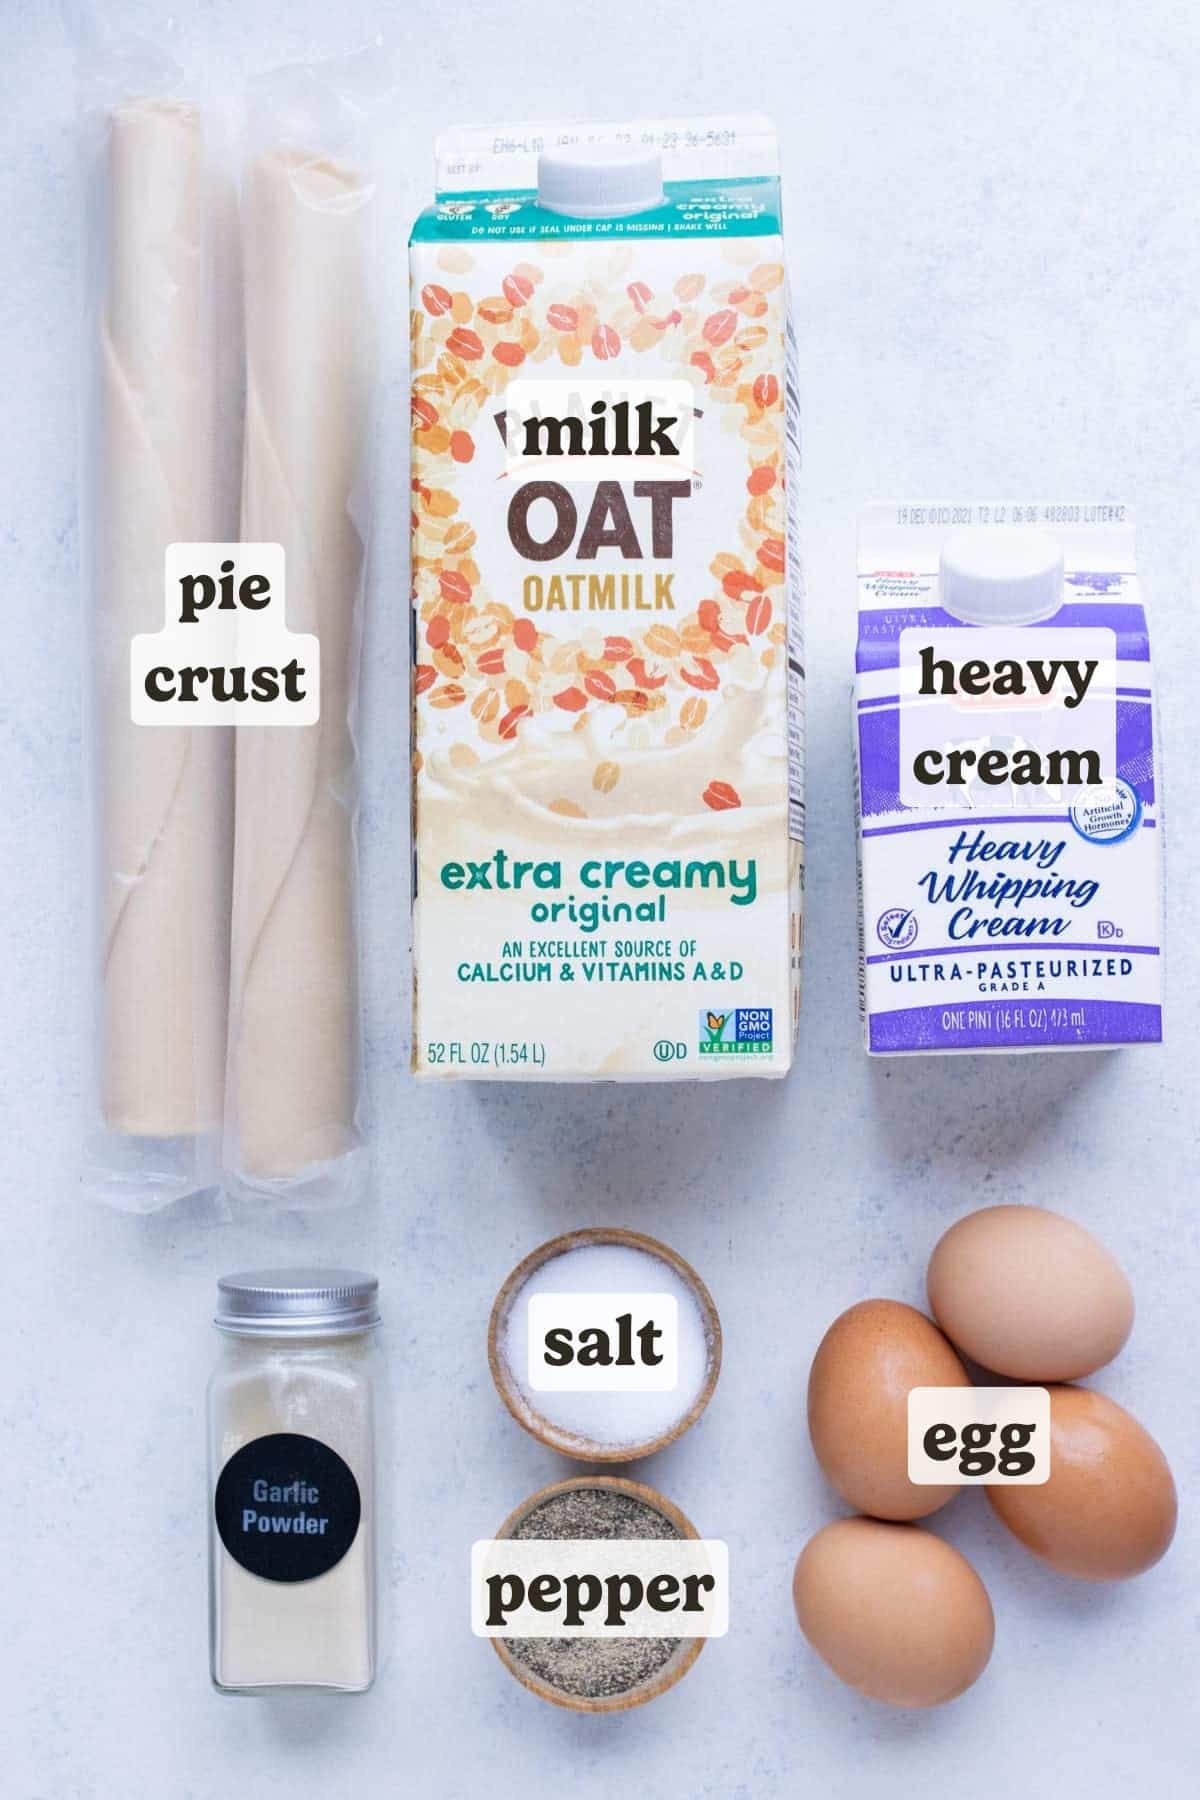
Pie Crusts: You’ll need about 14 ounces (2 crusts) to make 48 mini quiches. Homemade pie crusts are always delicious, but store-bought works just as well when you’re short on time. You can even swap in puff pastry for a flakier, more indulgent bite. Just make sure to chill homemade dough for at least 2 hours before rolling it out.
Eggs: Five large eggs are all you need for that perfect custardy texture. Stick with large (not jumbo) as too much liquid will throw off your ratio.
Milk or Cream: I’ve tested this recipe both ways, and it’s honestly great with either! Heavy cream gives a richer, more velvety texture, while regular milk (or even a full-fat plant-based milk) still makes them light and fluffy.
Seasonings: A simple mix of salt, black pepper, and garlic powder adds great flavor to the base. Feeling fancy? Toss in a pinch of paprika or a dash of dried herbs for extra depth.
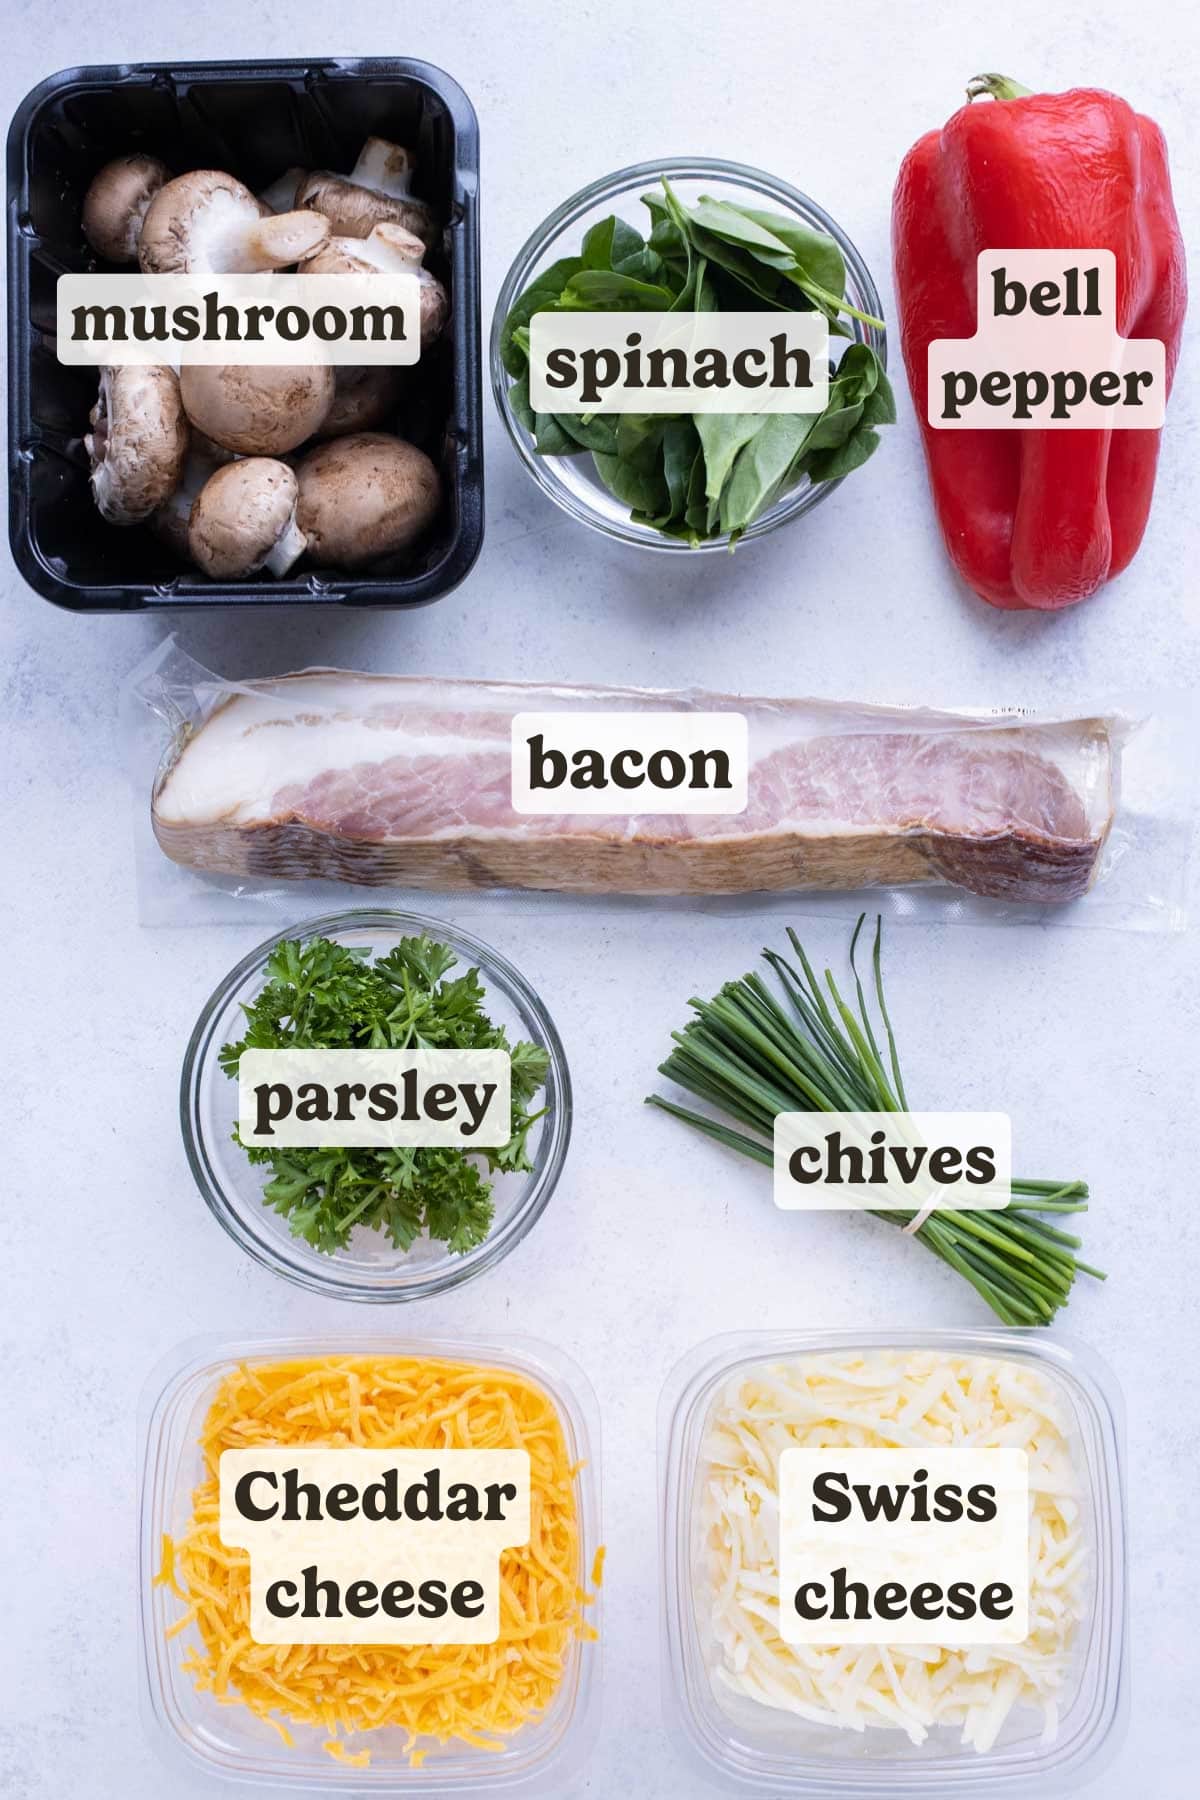
Cheese: Finely shredded cheese works best so it distributes evenly in the small cups. Sharp cheddar, Gruyère, or Swiss are my go-tos, but use what you love—or skip it if you’re keeping things dairy-free.
Add-Ins: This is where the fun begins! You’ll need about 1 cup total. Try sautéed veggies like spinach, mushrooms, or bell peppers, or go the meat-lover route with crispy bacon, ham, or sausage. Just make sure meats are cooked before mixing in, and cut veggies small so they get tender as they bake.
Get My 10 Holiday Sides with Serious Swagger
Tasty twists on classics that will get the WHOLE table talking!
Step-by-step Instructions
Please see the recipe card below for the full instructions, ingredient amounts, and a printable recipe.
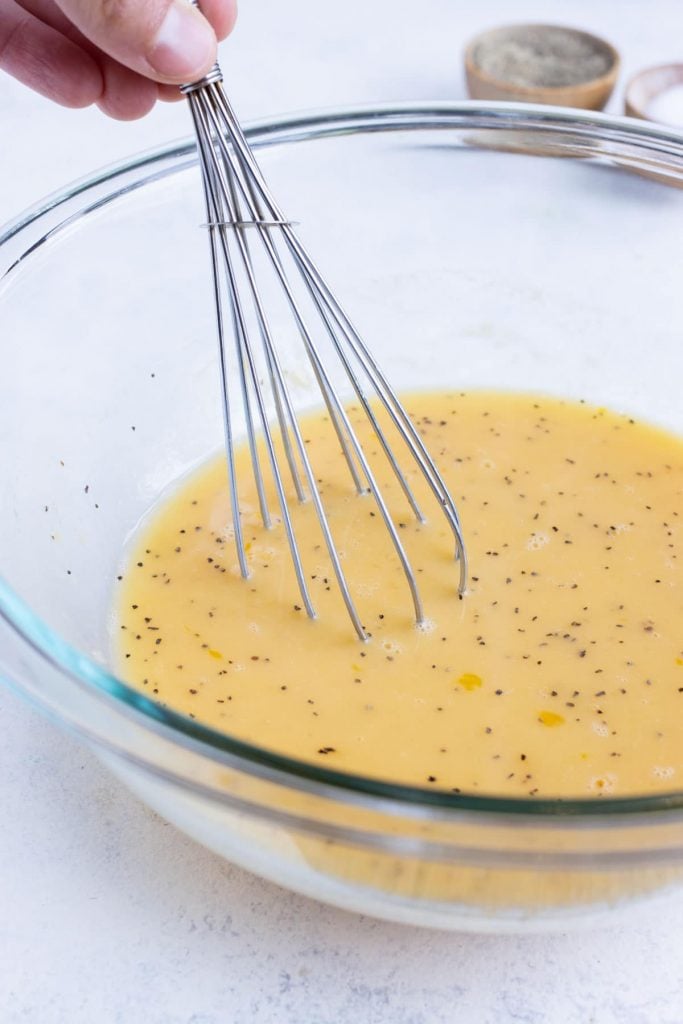
Whisk the egg mixture.
Crack the eggs into a medium bowl or large measuring cup (the spout makes pouring way easier!). Add the milk, salt, pepper, and garlic powder, then whisk until smooth. Pop the mixture in the fridge while you prep everything else
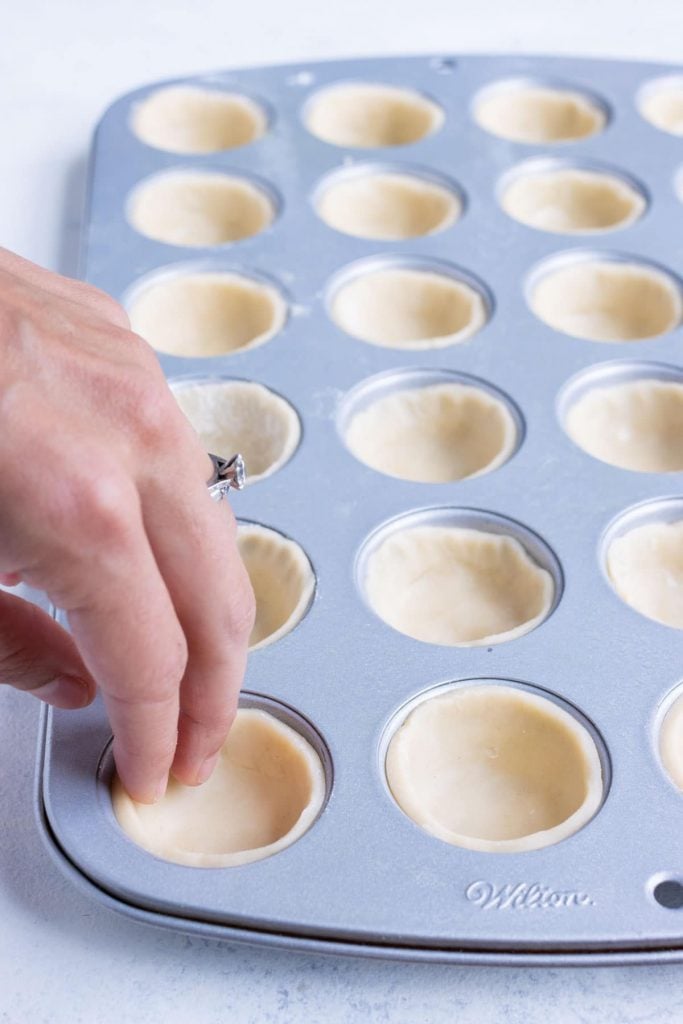
Prep the crusts.
On a lightly floured surface, roll the dough into a 12-inch circle. Use a 2 ½-inch round cutter to punch out 24 circles per crust, re-rolling the scraps as needed. Lightly grease a mini muffin tin and press each round into the cups so the dough reaches up the sides.
Pro Tip: You can also make a homemade pie crust and chill the dough up to 3 days ahead so it’s ready to roll and bake when you are!
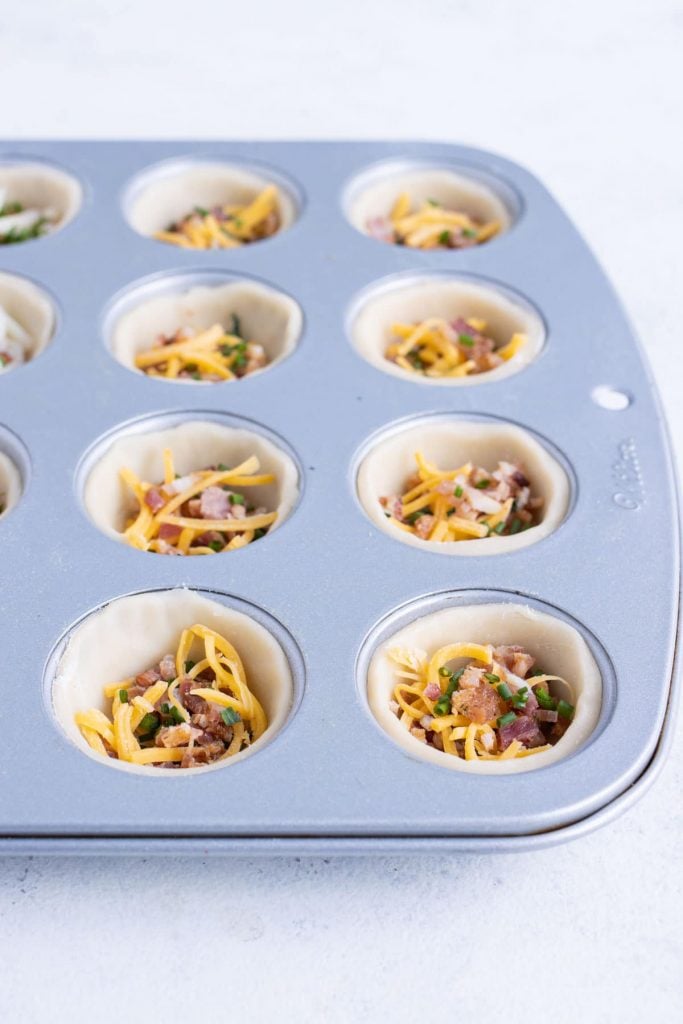
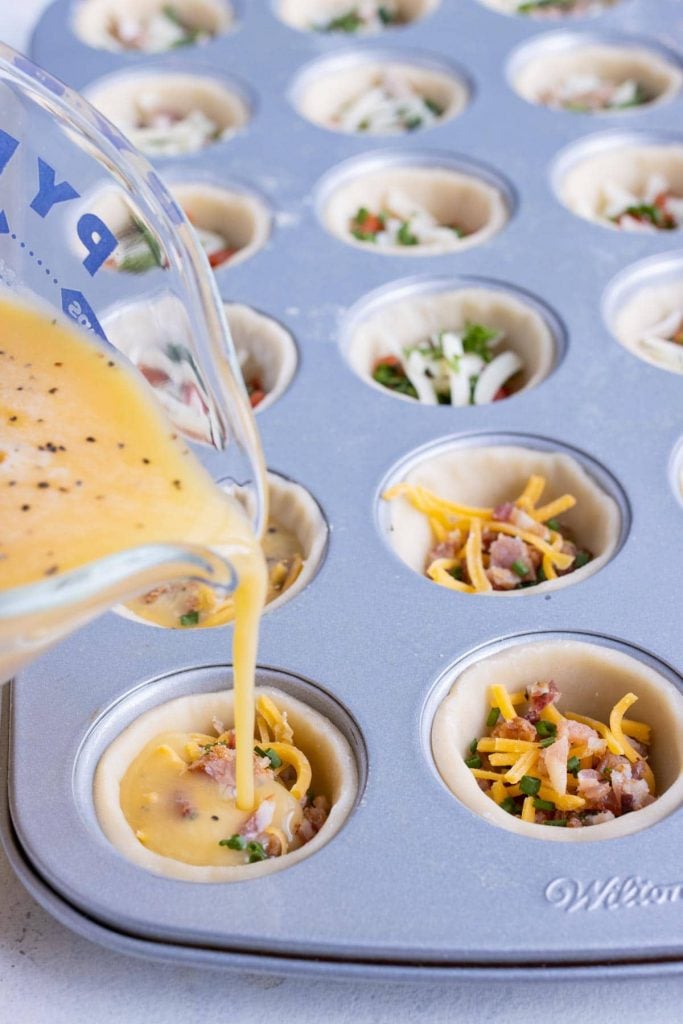
Fill the quiches.
Add about 1 teaspoon of your chosen add-ins (veggies, cheese, or cooked meats) into each crust, then pour the egg mixture over the top—filling each cup about 80% of the way. Give the fillings a little stir so everything’s evenly mixed.
Pro Tip: Gently fold the crab meat, bacon, or any larger mix-ins into the egg base if you’re worried about them sinking or clumping. You’ll get those perfect little pockets of flavor in every bite.
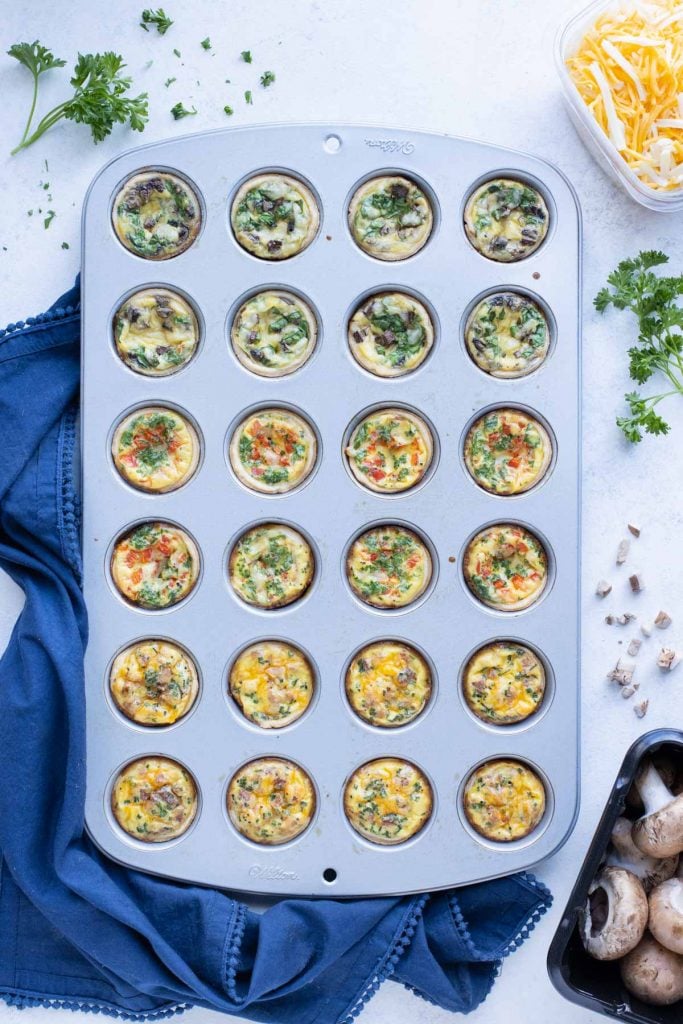
Bake until golden, rest, and then dig in!
Bake the quiches at 375°F for 20–22 minutes, or until the crusts are golden brown and the centers are set (they shouldn’t jiggle when you tap the pan).
Pro Tip: Let the quiches cool in the pan for 5-10 minutes before removing. This helps them firm up and make them so much easier to remove from the pan!

Fun Flavor Variations to Try!
One of the best parts about mini quiches is how easy they are to customize! Whether you’re serving brunch, a holiday party, or just cleaning out your fridge, the flavor combos are endless. Here are a few of my go-tos:
- Bacon, Cheddar & Chive: Crispy cooked bacon, sharp cheddar, and a sprinkle of fresh chives—always a crowd favorite.
- Mushroom, Spinach & Swiss: A hearty vegetarian option! Finely chop the veggies so they bake evenly, and don’t skip the nutty Swiss—it ties everything together.
- Bell Pepper & Mozzarella: Sweet peppers, melty mozzarella, and a sprinkle of fresh parsley or basil for a Caprese-inspired twist.
- Mediterranean Mix: Sun-dried tomatoes, feta cheese, Kalamata olives, and fresh herbs bring those bright, briny Mediterranean vibes.
- Tex-Mex Fiesta: Add a little kick with chopped jalapeños, shredded Mexican cheese, and a dash of taco seasoning or salsa.
- Sweet & Savory Sensation: Caramelized onions, crumbled bacon, tangy goat cheese, and a drizzle of honey. It sounds fancy but couldn’t be easier!
Prep-Ahead Directions
- Prepare the crust: Homemade pie crust can be made up to 3 days in advance and refrigerated until you’re ready to roll it out. That way, you’re one step ahead before guests even arrive.
- Fill the crusts: You can add your mix-ins (veggies, meats, or cheese) ahead of time, but wait to pour in the eggs until right before baking. This keeps the crust nice and crisp instead of soggy.
- Assemble and chill: If you’d rather bake them ahead, go for it! Just let the mini quiches cool completely, then store them in an airtight container in the fridge for up to 24 hours. When it’s party time, simply reheat in the oven until warmed through.
Storage & Reheating
To store: Let the mini quiches cool completely, then transfer them to an airtight container. Store in the refrigerator for up to 3-4 days.
To freeze: These freeze beautifully! Arrange the cooled quiches in a single layer on a baking sheet and freeze until solid. Then transfer them to a freezer-safe bag or container and freeze for up to 3 months.
To reheat: Pop refrigerated mini quiches in a 350°F oven for 8-10 minutes, or until warmed through. If frozen, let them thaw in the fridge overnight before reheating. (You can microwave them in a pinch, but the crust won’t be quite as crisp.)
FAQs
Chafing dishes are the most convenient way to keep appetizers like mini quiche warm when entertaining.
Definitely! Just grease your muffin tin really well and skip the crust altogether. The baking time may be a few minutes shorter, so keep an eye on them near the end.
Anything goes! Try crispy bacon and cheddar, spinach and mushroom, or even bell pepper and mozzarella. Just make sure any meats are cooked and veggies are chopped small so they bake evenly.
Yes! Let them cool completely, then freeze in a single layer on a baking sheet. Once frozen, transfer to an airtight container or bag. They’ll keep well for up to 3 months.
Tap stars to rate!
Mini Quiche Recipe (So many flavors!)

email this recipe!
Ingredients
- 5 large large eggs
- 1 cup milk or heavy cream
- ¾ teaspoon salt
- ¼ teaspoon black pepper
- ¼ teaspoon garlic powder
- 2 (7-ounce) pie crusts
- ½ cup shredded cheddar cheese or Swiss
- 1 cup add-ins bacon, mushrooms, bell peppers, chives, etc.
Instructions
- Preheat the oven to 375°F.
- Whisk together the eggs, milk, salt, pepper, and garlic powder in a large bowl with a spout or in a large measuring cup. Refrigerate until ready to use.5 large large eggs, 1 cup milk, ¾ teaspoon salt, ¼ teaspoon black pepper, ¼ teaspoon garlic powder
- Roll out dough on a lightly floured cutting board until it is at least 12 inches round in diameter. Use a 2 ½-inch round cookie cutter to cut 24 circles from each sheet of pie crust. You will end up re-rolling the dough about 3-4 times. Press pie crust rounds into the bottoms of a mini muffin tray that has been sprayed liberally with non-stick cooking spray. Press up the sides so the crust completely covers them.2 (7-ounce) pie crusts
- Fill each pie crust with 1 teaspoon of add-ins and a sprinkle of cheese. Pour in the egg mixture and fill up just shy of the top of the pie crust. Use a small spoon to mix together all of the add-ins and cheese so they’re evenly distributed throughout the egg mixture.½ cup shredded cheddar cheese, 1 cup add-ins
- Bake at 375°F for 20-22 minutes, or until the pie crust is golden and the egg middle no longer jiggles. Serve immediately with a sprinkle of fresh herbs and enjoy!
Tap stars to rate!
Video
Notes
- Pie crust: You’ll need about 14 ounces (2 crusts) total. A homemade pie crust or store-bought both work great. If homemade, chill for at least 2 hours before rolling.
- Filling tip: Fill only about 80% of the way for the best crust-to-filling ratio.
- Add-ins: Cook meats fully before adding and chop veggies small so they bake evenly.
- Cooling: Let the quiches rest for 5-10 minutes before removing from the pan—they’ll firm up and release more easily.
- Storage: Store leftovers in an airtight container in the fridge for up to 4 days, or freeze up to 3 months. Reheat in a 350°F oven for 8–10 minutes.
- Prep ahead: You can roll out the pie crust, whisk the egg mixture, and chop your add-ins up to 2–3 days in advance. Store each separately in the fridge, then assemble and bake when you’re ready. The crust and fillings stay fresh, and you’ll look effortlessly put-together when guests arrive!
Nutrition
Nutrition information is automatically calculated, so should only be used as an approximation.
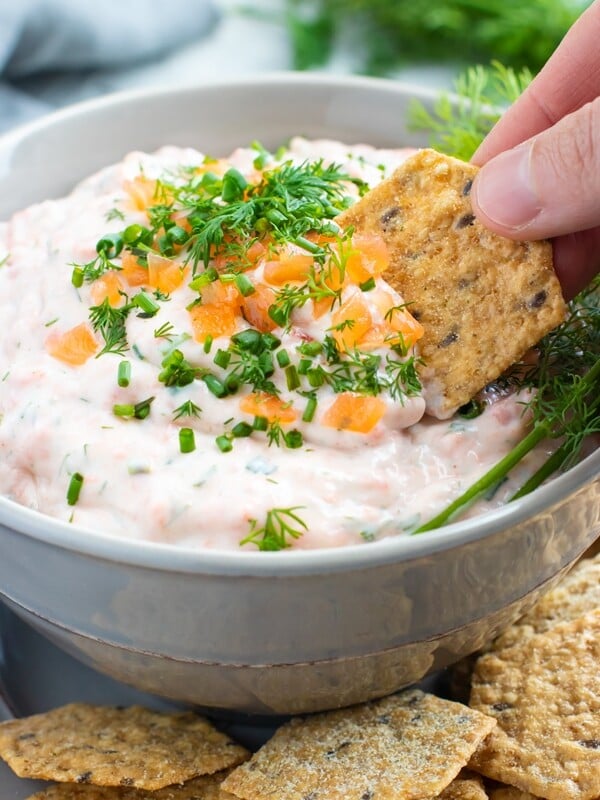
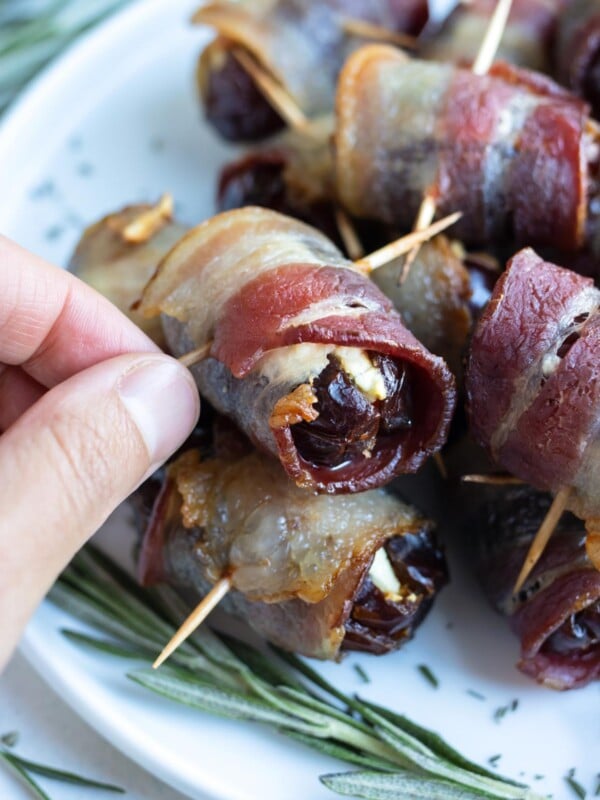
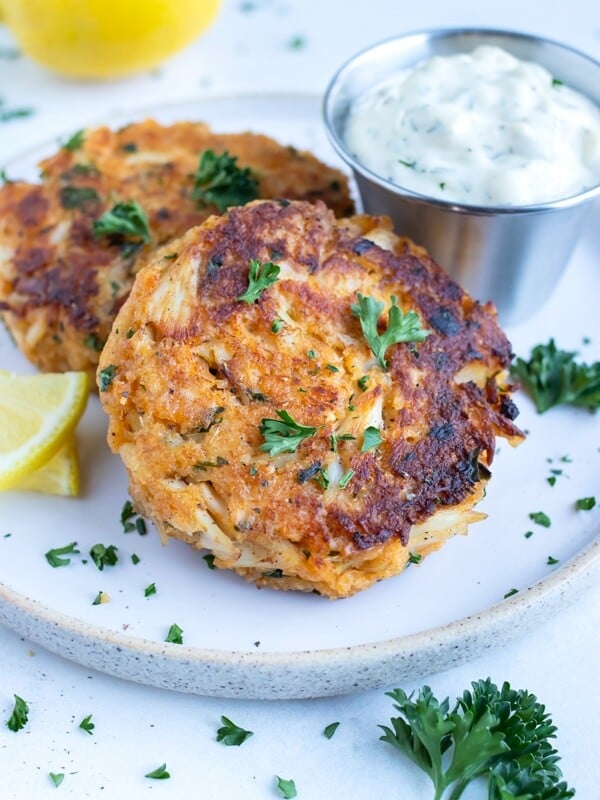
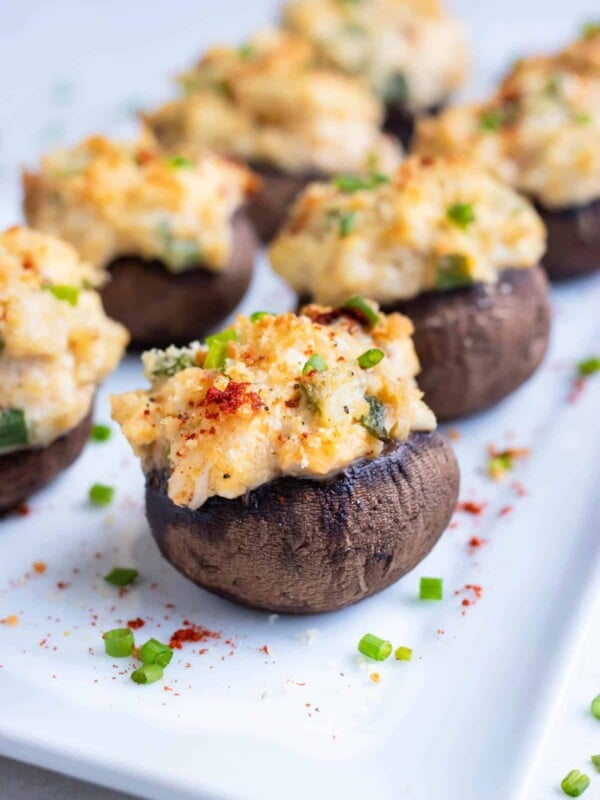
Other Easy Party Appetizers
These tasty snacks are great to enjoy anytime.


Made 100 mini quiches . All perfect , the best easiest recipe . Thank You they were gone in 20 minutes . 😋
Stephanie, thank you so much for leaving a comment! Wow — 100 mini quiches is impressive! I’m so happy the recipe turned out perfectly for you, and it sounds like they were a huge hit. Thanks again for sharing!
These turned out great- I tried 24 with crust and 24 without and the “without” batch was this girls error haha. I don’t think the non stick spray worked and or didn’t use enough! The crust way was very impressive and a big hit at my Bible study! Will def make again !
Thanks so much for leaving a comment! I’m so glad the crusted ones were a hit — perfect for a group like Bible study! 😊
The crustless version can definitely be a little trickier with sticking, so you’re not alone there. So happy you’ll be making them again — thanks for sharing!